Inspiration for theCafelat Robot
If there was ever a golden age for espresso machine design, it had to be the 1950s. That decade saw an explosion of creativity, with manufacturers pushing the limits of style and functionality to make machines that were as eye-catching as they were innovative. The competition among manufacturers to create standout designs was fierce, leading to some truly iconic creations. While many of the most groundbreaking designs were reserved for commercial espresso machines, a few major players in the industry also turned their attention to the home market. Two such pioneers were Faema and Gaggia, whose contributions left a lasting impression.
In 1952, Gaggia introduced the Gilda, one of the first consumer-focused lever espresso machines that could produce modern day espresso. Named after a 1946 film starring Rita Hayworth, the Gilda embodied elegance and sophistication of the era. Its design was compact and streamlined, featuring a polished metal body and a wood handled lever mechanism that allowed users to manually control the brewing process.
The Gilda also represented a turning point in home espresso making. Unlike larger commercial machines, it brought the espresso experience into domestic kitchens without much of a sacrifice in drink quality. Its lever system mimicked the mechanics of professional machines, enabling home users to achieve crema-topped shots. The introduction of the Gilda really did set the stage for future innovations in home espresso technology, proving that compact, beautifully designed machines could deliver café-quality results.
Faema was the other big player in the dawn of modern day home espresso. They introduced two standout models between 1952 and 1956 to also cement their role in bringing real modern espresso into the home.. The first was the Faemina, an electrically powered lever machine that combined polished chrome and aluminum surfaces with elegant curves, bevels, and a spring piston system. It even featured a sight glass, adding both functionality and visual appeal. The Faemina managed to be both sophisticated and practical, appealing to those who valued craftsmanship and performance in equal measure.
The second model, the Faema Baby was introduced in 1956, and it took both a completely different approach to the Faemina, and queues from the Gaggia Gilda. It was a fully manual machine—no power, no motors, just pure mechanical operation. Its design was a conversation starter all on its own. With its vertical, torpedo-like body and butterfly-style arms, the Faema Baby brought a playful yet refined aesthetic into the kitchen. Adding to its charm, it was available in a wide range of vibrant colours, making it as much a decorative piece as it was a functional appliance.
The 1950s truly set the stage for the espresso machines we see today. It was a time when style met substance, and machines were built not just to make great coffee, but to make a statement.
Paul Pratt, of Cafelat fame,, has long admired the Faema lineup—especially the Faema Baby. While intruiged by its design, he also saw plenty of room for improvement. As a respected restorer of historical espresso machines and a specialist in small-scale parts manufacturing, Pratt had the skills and vision to bring his ideas to life. In 2015, he embarked on a personal project to reimagine the Faema Baby, which had been out of production since the 1960s. By 2016, Pratt began sharing glimpses of his progress on his Instagram account, posting teasers that quickly captured the espresso community’s attention. The enthusiastic response convinced him that his modernized machine was worth bringing to market.
What followed was a whirlwind of development, mounting interest, and eventually a wildly successful Kickstarter campaign. With funding secured, Pratt pushed forward into manufacturing, and today, the machine is available to anyone ready to invest $395 or more.
From the outset, Pratt described the Cafelat Robot as a passion project, but he also saw it filling a niche in two key markets. First, it appealed to home espresso enthusiasts looking for a unique, hands-on brewing experience. Second, it catered to budget-conscious coffee drinkers who often rely on preground espresso, sold in what Pratt refers to as “those coffee bricks at the deli.” He’s openly critical of pod-based systems like Nespresso and Keurig, citing environmental concerns over waste. As a result, the Robot comes with two basket options: a standard double basket that holds 15–18 grams of coffee and a pressurized filter basket designed for preground coffee.
During development, Pratt also experimented with adding a visible pressure gauge to the machine. Today, this feature is available as an optional add-on with the Barista Edition.
That’s the backstory—now let’s dive into the machine itself!
Out of the BoxCafelat Robot
The Cafelat Robot arrived in what I personally called “Bianchi Green” painted finish, but Pratt says it’s Pantone #623C and called Retro Green. Other colours available include Matt Black, Red, Blue, and Orange. When the Kickstarter campaign was live, there was a yellow model available for backers only as an option. Also, when it originally shipped, there was also a bare polished metal version (as seen on the original box, below).
The machine is packed well with spacers and bubble wrap at the right points; more importantly, it ships nearly fully assembled. The portafilter, basket and tamper are packed in a white box along with a water spreader device (more on that below). Closing out the accessories is a silicone mat to use on the machine’s drip tray area. If you buy the basic version with a pressurized filter basket, it also comes with a coffee measuring spoon. If you buy a Barista version of the machine, it also comes with a piston blanking plug and a teflon washer (for sealing off the pressure gauge insert area inside the machine if you don’t want to use the pressure gauge).
Fit and finish is absolutely stellar. Pratt personally assembles and inspects these machines (or did at the time this First Look was originally written) when they leave his workshop, and he’s a stickler for details. Ours arrived… perfect. We also got the armored pressure gauge version (called the “Barista” version). The paint is perfect. The polish on the aluminum and steel parts is perfect.
The machine really does look like a robot. I’ve seen and actually used a vintage Faema Baby and those machines, even with 60 years of age accounted for, look kind of cheap and mass-manufactured with not much attention to exacting details. Not so with the Cafelat Robot. This is a real work of functional art.
There’s no “drip tray” as it were, a well to collect extra water. The machines do come with a silicone mat that has grid lines that marry well to the machine’s own cup area. It prevents your cup from sliding around as you’re exerting pressure while making a shot of espresso. It is reversible, and the side with the two cup cutout areas does catch some spills.
The portafilter is a super deep affair, designed (with the removable filter basket) to hold both your ground coffee and the brewing water. It is made out of nicely weighted (225 without the spouted bottom, 420g with it included) stainless steel, and does stay toasty hot, especially when pre-rinsed with boiling water. Keep in mind this is a completely manual, unpowered machine, and you’re the one who’s supplying the heat and water. In the full review, I’ll talk more about how to get the most out of this machine and get good operating temperatures, including a recent change Pratt made, with the design of a new silicone insert that acts like a blind filter, allowing you to fill the reservoir with boiling water, and preheat the entire machine.
The portafilter has a removable base with the pouring spouts. Pratt did this so you can choose to use it “chopped” (aka naked portafilter), or with the dual spouts in place. I like the idea of keeping the spouts in place because it will aid in retaining heat during brewing as long as it was part of the preheating process.
The included 58mm filter basket (we got both the unpressurized basket and the pressurized one, for purposes of this First Look) is also deep because, again, it is designed to hold both the ground coffee and your brewing water. It is also made out of stainless steel.
There’s also a water dispersion screen included which is an absolute necessity during brewing. It goes on top of your ground coffee inside the filter once you tamp everything down. Our unit is all metal; it has been redesigned in the past few years to have a silicone grip for easier removal.
The machine comes with a tamper, and at first you might be dismissing it as a basic, budget tamper, like I did. But guess what; it actually has some smart engineering to it, and is finished quite nicely. It’s basically a 58mm disk married to a tube, but there’s more to it than that. It fits the deep filter baskets absolutely perfectly, and the long tube arm of it is designed to still give you purchase and a confident grip when tamping. The edges are finished nicely (for instance the tube’s top hole is rounded off, so it isn’t a sharp edge), and it’s designed to actually fit in one of the Robot’s “hands” on the lever arms when not in use. Nice engineering!
Here is everything that comes in the box (back when we first published this in 2019).
Subscribe to
Coffee Pulse
Join the 12,850 other coffee lovers who receive CoffeeGeek's premier newsletter. Each issue dives deep into one coffee or espresso based subject. Subscribing is free, and your personal information is never shared.
By submitting this form, you are consenting to receive marketing emails from: CoffeeGeek. You can revoke your consent to receive emails at any time by using the SafeUnsubscribe® link, found at the bottom of every email. Emails are serviced by Constant Contact

Support CoffeeGeek
If you enjoy and learn from this resource, please consider making a one time or recurring donation to help support our work and fund purchases for future reviews.
First UseCafelat Robot
Before using the machine, I did blast a lot of boiling water through it, just to clean things out a bit and get the gaskets primed up a bit. Not necessary, but I did it anyway. I also did it to familiarize myself a bit with the machine and the play in the lever arms.
Without the portafilter assembled and the piston arms down, the actual piston in the machine seems to hang a bit loose and even looks like it’s not quite lined up. This is perfectly normal, as Pratt designed it to be on a camber with the two piston arms and be a bit “floppy” to allow for full, easy assembly with the portafilter and filter baskets. Again, nothing to worry about: the machine is properly assembled and operating with this “floppy piston”.
When inserting the portafilter, make sure the arms on the machine are in the up position, and hold the portafilter so you have the tabs (the bayonets) aligned with the front and back of the machine; once in place, screw the handle to the right until it’s almost touching the right front arm. Or… you can screw the handle to the left, if you want. It’s ambidextrous!
If you want to attach the bottom section of the portafilter with the spouts, do yourself a favour and heat it up first with hot water, especially around the white silicone gasket. It’ll make it that much easier to attach it firmly to the main portafilter body.
I had some extensive experience with a competing product — the Flair Espresso Maker — which can be really finicky with the grind you use (and the coffee dose), so I kept that in mind with the Cafelat Robot. I purposely used a coarser grind than I normally use with powered espresso machines and kept my first dose to 16 grams. Also the main literature for the Robot suggests a 14-16g dose, so I went with the top end of that.
Turns out I didn’t have to worry as much, as the first shots were pretty gushy. So after dialing in the grind a bit more (not as fine as a La Marzocco GS3 can handle, but finer than the Flair espresso machine likes), and upping my dose to 17.5g, I was getting quite nice shots out of the machine.
I was already getting the sense that this machine is easier to use than other competing products, like the Flair Espresso Maker and the ROK espresso maker. The Flair is a great machine, and it’s main achilles heel is how much work is required after you’ve brewed a shot to set the machine up to brew another shot. It’s easier and quicker with the Cafelat Robot; I think I could bang out 3 shots for every single shot pull done on a Flair. And while the Robot and Flair are on par in terms of how hot a shot you can pull, both easily beat the ROK on heat retention and pulling a shot of espresso at near optimal temperatures.
Longer Term UseCafelat Robot
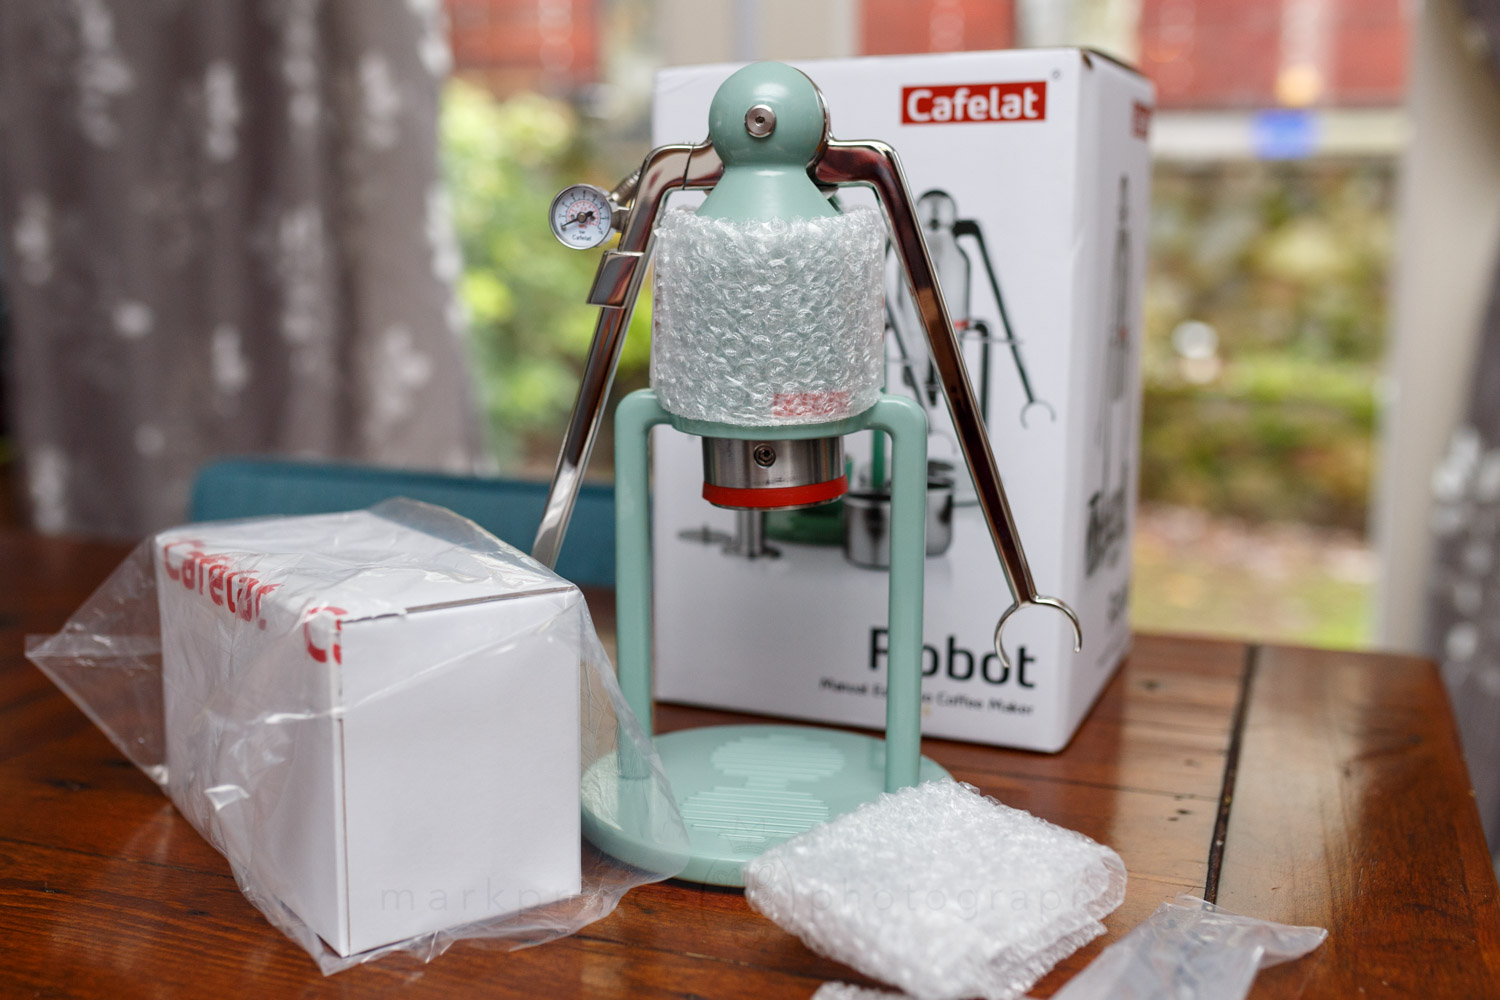
I need to preface this is a First Look, and based on very preliminary testing of the Robot. I have not run temperature tests, repeated tests, or anything more serious that we reserve for our full product reviews. I basically just used this machine as any consumer would, and my notes below reflect that.
Update, Late 2024
Since writing this First Look in 2019, I’ve pulled thousands of shots through the Cafelat Robot, and have run some extensive tests including temperature tests. Paul Pratt has also updated the machine slightly and introduced a new accessory: a silicone “blind filter” style insert to help with pre-heating the Robot much better. As a result, a lot of what we covered in this initial First Look on temperatures is moot.
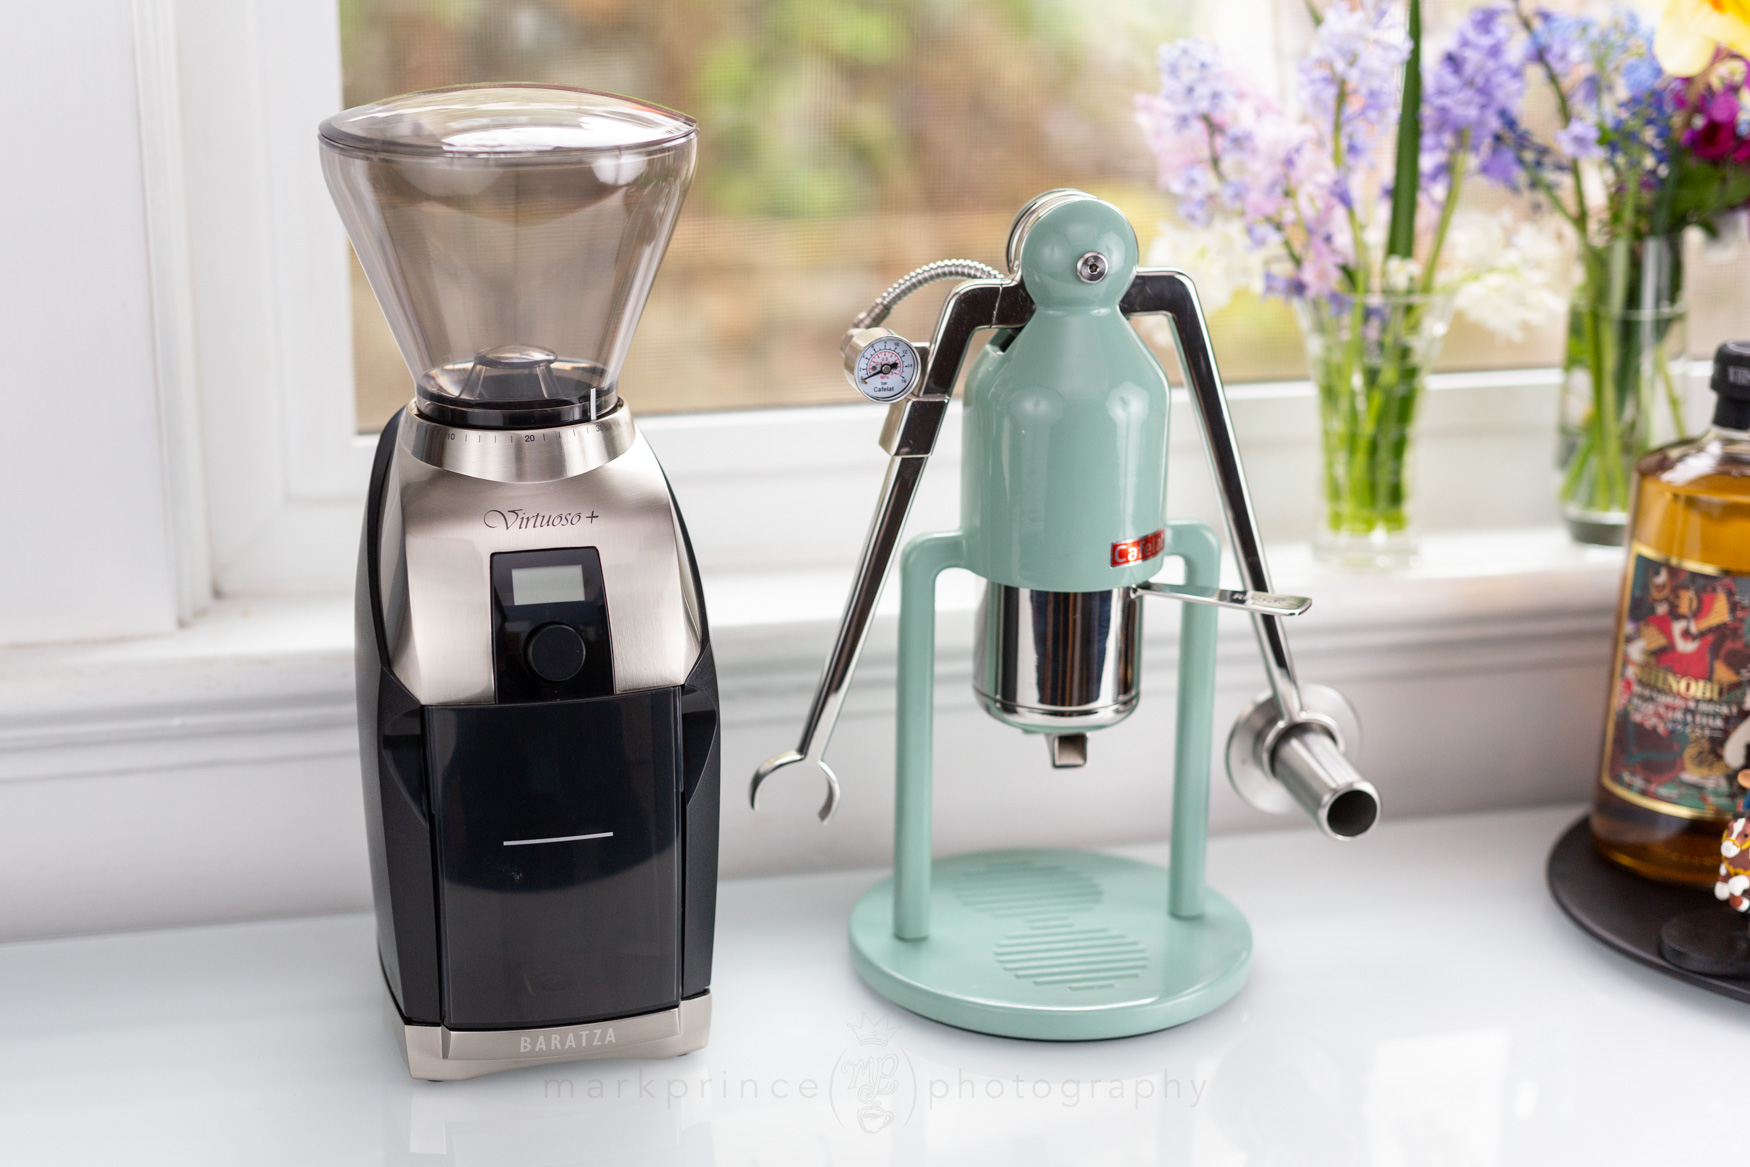
How Much Coffee to Use
To be honest, you can play with as much or as little ground coffee in this machine as you want. Want a 9g single shot? Go for it. Want a 25g triple shot? Again, the world is your oyster, just adjust the grind to make it happen. The filter basket is so huge, you could even use the machine to brew a heavily concentrated coffee “syrup” of sorts with it, by using something like 30+g of more coarsely ground coffee, and letting the brew water steep for a few minutes before using the lever arms to complete the extraction. I’ll definitely be playing with these aspects for the full product review.
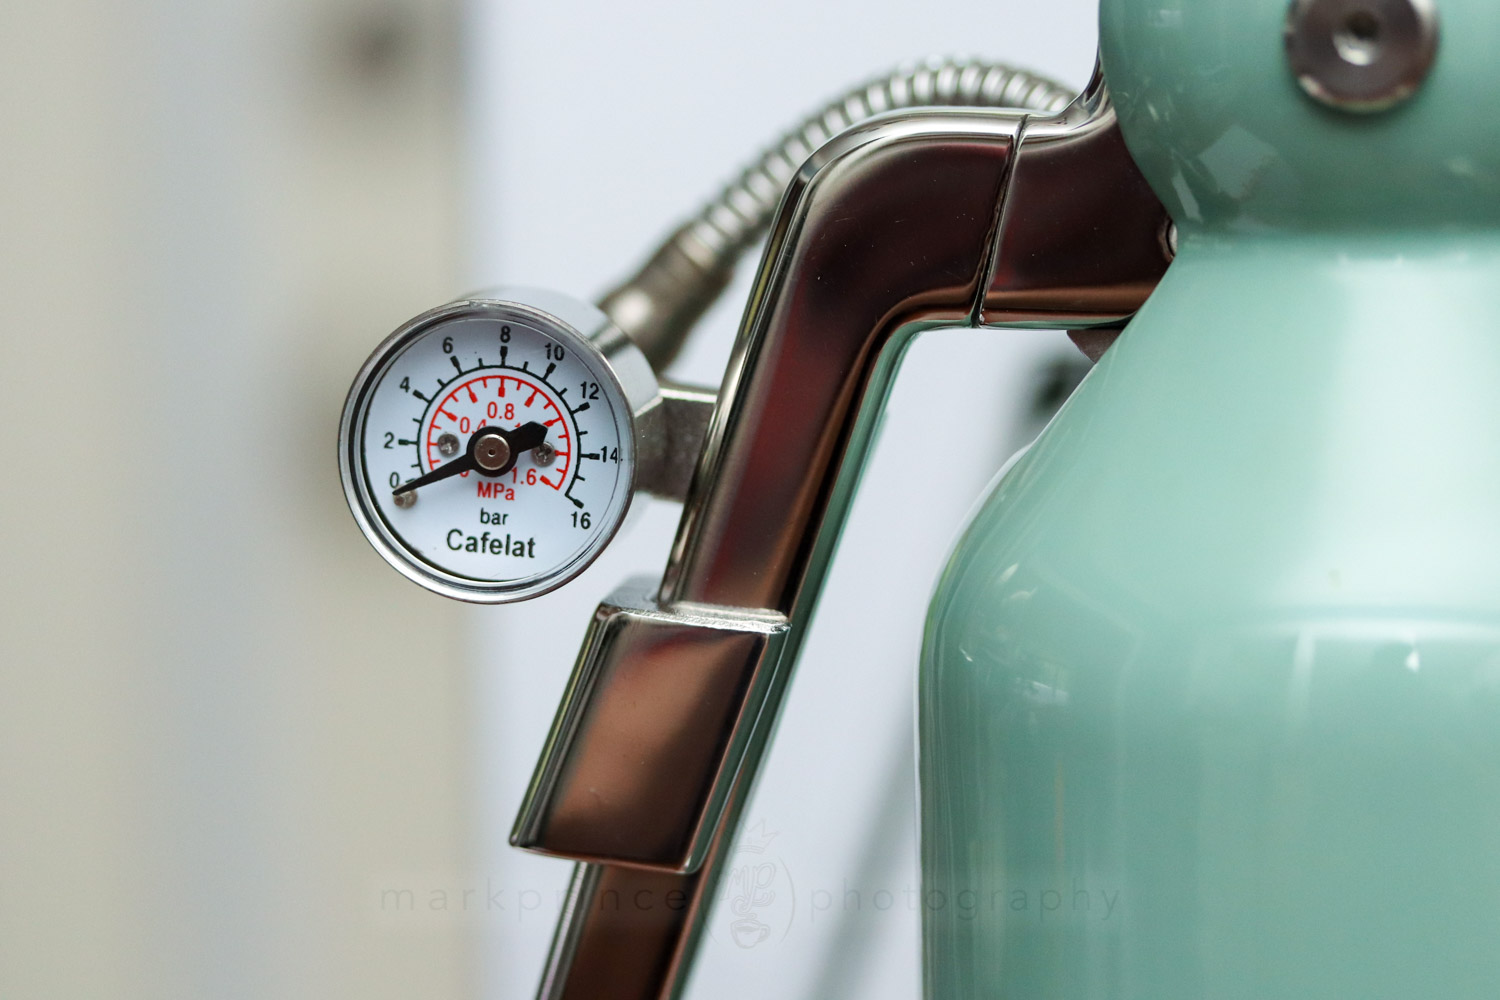
How Much Pressure to Apply
It’s hard to describe how much pressure to put on the arms of this machine, but one thing is for sure: if you find you’re really starting to strain, and very little liquid is coming out, your grind is too fine.
It’s best to go with the tried and true “does this feel safe?” test when applying pressure to the levers. Given the short reach of them, to get to 9bar pressure, you will have to exert some force, but not enough that you feel like a blood vessel is going to pop, or the machine’s going to go flying across the counter if you slip up. It’s okay to lean over the machine a bit to get a nice, even and hard pressure pushing the arms; but if you’re starting to feel the arms flexing under your strain, you’re definitely pushing too hard, and the grind is too fine.
How Much Water to Use
Again, you’re pretty free with how much water to put into the portafilter; you can just put enough for a 1:2 ratio shot (or even a 1:1.5 ratio ristretto shot): that would be about 40-50ml starting water. If you want to use the CoffeeGeek standard of a 1:2.5 ratio shot, add around 70-80ml of water at the start, or more. The bonus here is this – you don’t have to use all the water when brewing your shot! You can load up the water inside, and pull (push) out enough brewed espresso to fill a 45ml cup, and… stop. Lift the lever arms, swap out a drainage cup for your espresso cup, and press down again to flush out any remaining brew water through the puck.
Clean Up and Pulling Multiple Shots
I mentioned this above, and in my preliminary use of the machine it’s confirmed: this machine is a lot easier to use, overall, than the beautiful and functional Flair Espresso Machine. You can’t go wrong with either, but if you want to be able to pull multiple shots with these unpowered, manual machines, the clear choice is the Cafelat Robot.
It has to do with the piston. On the Flair, the piston is not part of the main machine; it’s a tamper-looking thing that ends up deep inside the Flair’s “portafilter” chamber. You have to remove that, which, when hot and toasty with spent coffee, isn’t the easiest thing.
On the Cafelat Robot, the piston is part of the main machine, and lifting the lever arms removes the piston entirely from the portafilter and filter basket. At this point, those parts are more or less a traditional portafilter and basket, meaning you can hold it, invert it, and knock out the spent puck of coffee. Give everything a quick rinse, and it’s ready to set up to pull the next shot.
Temperatures and Cup Quality
2024 update: most of this temperature talk is out of date if you use Cafelat’s new silicone insertion blind filter device, but is being left in for historical purposes and also if you have an older machine, or do not have the silicone insert.
Here’s how I am getting really good temperatures and finished cup quality on the Cafelat Robot, even this early on in evaluating the machine.
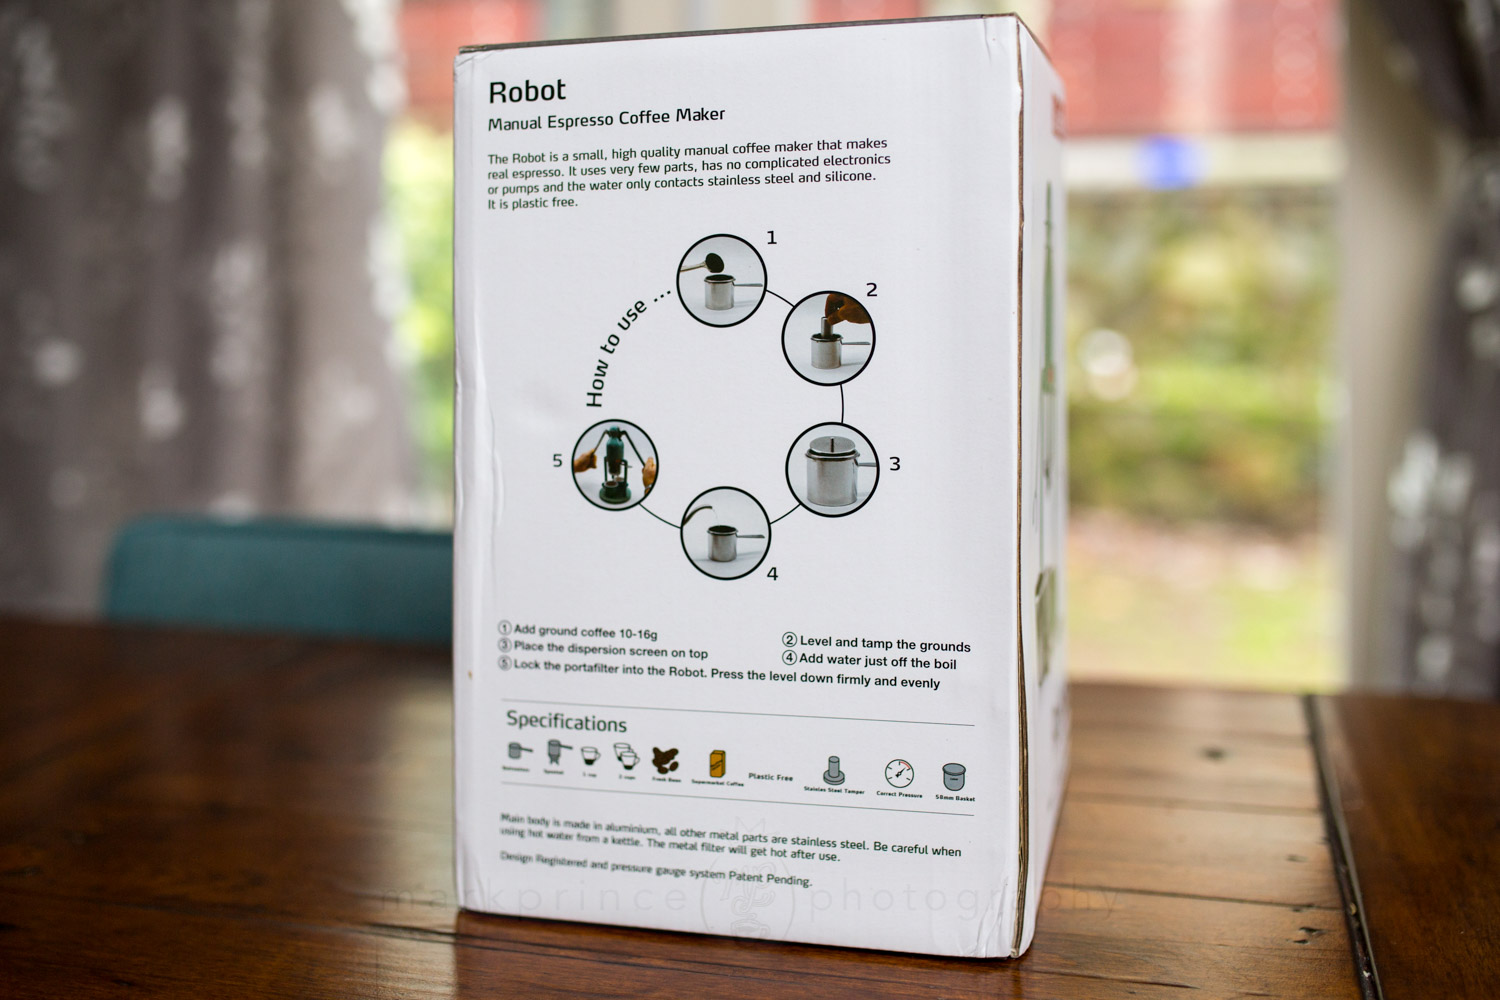
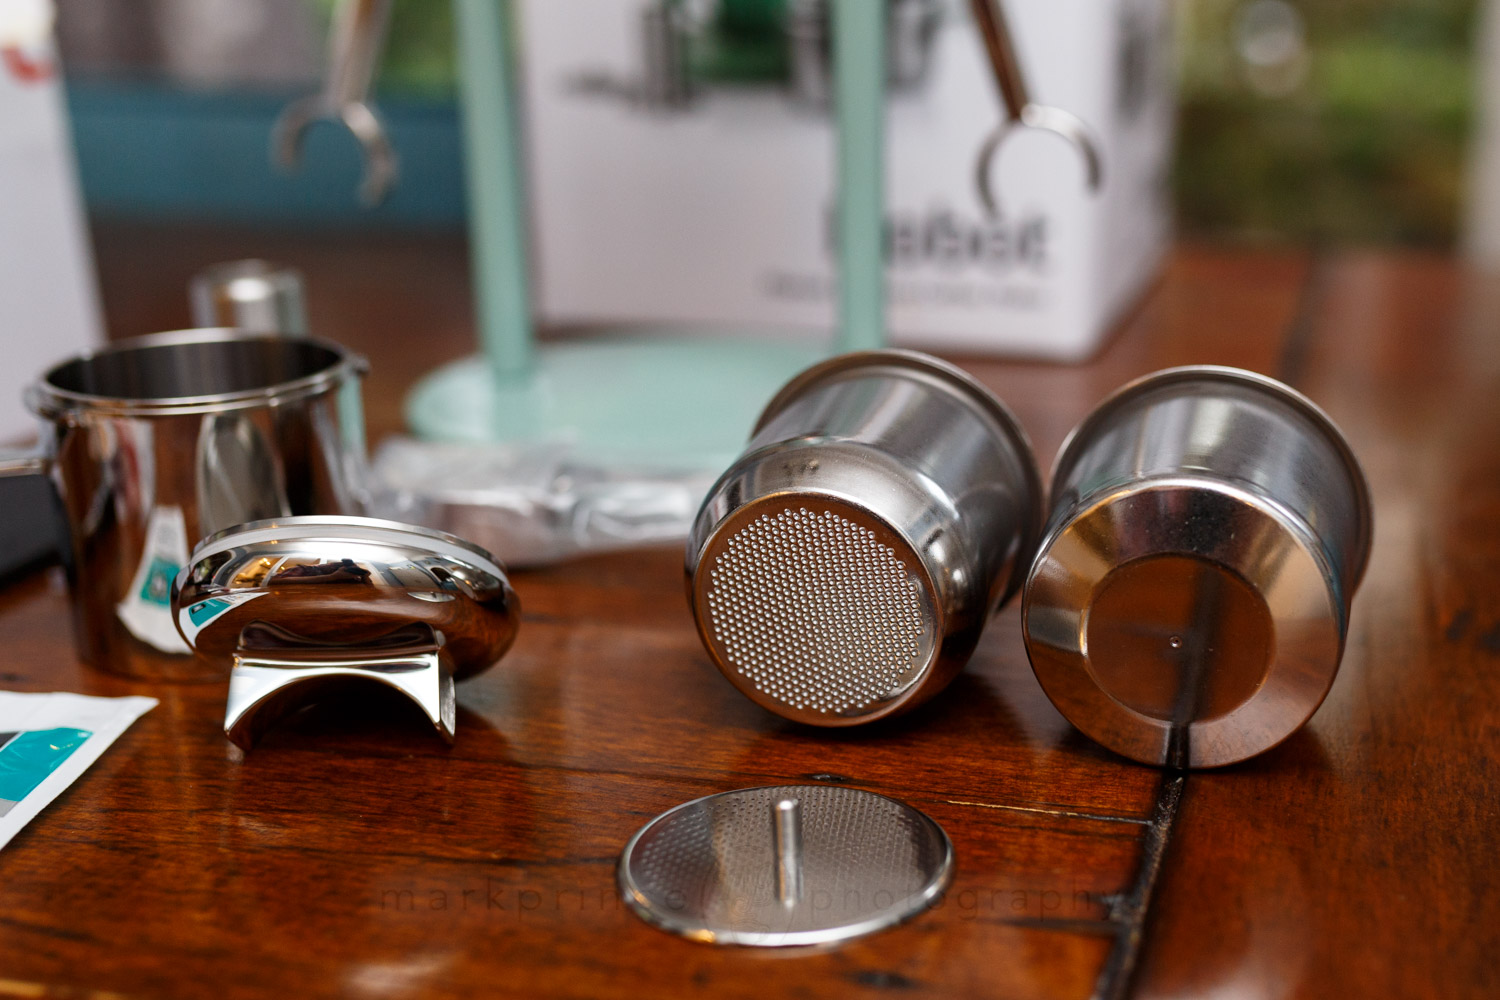
First, I put the main portafilter (with spouts attached for extra heat retention) into a bath of hot water (usually from the kettle I’m using for my brew water. Just a few seconds does it. Next, coffee is ground, and put in the removed filter basket. Tamped down, and then the dispersion screen is placed on top of the tamped, ground coffee.
Next, I put the filter back in the (now drained) portafilter assembly. And I do something that may be considered sacrilegious: I pour some boiling water into the portafilter to heat things up. Just for a few seconds, then I carefully pour it out. Next, pour in my dose of brewing water, off the kettle, and insert the entire portafilter assembly into the machine (with the Robot arms raised). Then I pull the shot, giving a short preinfusion time, into a preheated cup.
Here’s a few of the steps:
Result is a seriously good shot of espresso that certainly hits the right temperature spot, reminiscent of another machine I’m currently testing (a PID controlled Breville Bambino Plus). Early on, cup quality is really, really good with this machine, and I’m kind of surprised.

Support CoffeeGeek
If you enjoy and learn from this resource, please consider making a one time or recurring donation to help support our work and fund purchases for future reviews.
ConclusionCafelat Robot
The Cafelat Robot… what an amazing machine with (frankly) an amazing little story. Started off as a hobby “fun” project by one of the world’s better espresso machine restorers, because he loved the simplicity and iconism of a home espresso machine from the 1950s. Grew to the point where many fans, following the exploits of this fun project build on Instagram, were basically demanding their own. So many comments of “take my friggin’ money!” on all the photos back in 2015 and 2016. Then came some more serious design, more serious manufacturing plans, and then a Kickstarter campaign last Spring.
All along the way, it was a product with not many crazy promises, but one core one that stayed true: a simplified, easy way to make a really nice shot of espresso. All in a very unique and stylistic design.
The machine isn’t super cheap ($310, and I hear that’s almost breaking even for Cafelat) for the basic model, and $375 for the Barista version with the armoured cable pressure gauge. I imagine if demand ramps up enough to require much higher volume manufacturing, prices may go down (or Paul Pratt can make a decent profit finally off this), but you’re getting something quite substantial and capable for $310.
The machine is about the same price as the Flair Espresso Pro machine, and both have great pluses (with few negatives). It might even just come down to style. If you want something futuristic looking with a built in way to transport it, the Flair might still be your first choice. If you’re cool with the machine staying on your counter and want to pull shot after shot with little effort, then the Robot’s your choice, for sure.
The Cafelat Robot is currently available from the Cafelat store in four configurations (and three colour choices):
- Barista Model with regular basket, or with pressurized basket, $370
- Basic Model with regular basket, or with pressurized basket, $310
We use affiliate links to a) Amazon, and b) manufacturers only. Any links to vendors (including CoffeeGeek Sponsors) are not income generating links. Further details about our commission and affiliate link policies can be found on our Terms and Conditions Page. The use of any affiliate links have no effect on our editorial policy or review objectivity.
Subscribe to
Coffee Pulse
Join the 12,850 other coffee lovers who receive CoffeeGeek's premier newsletter. Each issue dives deep into one coffee or espresso based subject. Subscribing is free, and your personal information is never shared.
By submitting this form, you are consenting to receive marketing emails from: CoffeeGeek. You can revoke your consent to receive emails at any time by using the SafeUnsubscribe® link, found at the bottom of every email. Emails are serviced by Constant Contact


